


These brag books are just what you'd think. They're mini scrapbooks to show off the little ones in your life. They can easily fit in your purse and they're a definite upgrade from wallet photos.


The open ends of the lunch sacks become pockets for extra photos. So as time goes by you can always tuck more recent photos inside.

Within the last 6 months, my mom and Ryan's mom, both became grandmothers for the first time. They're both enamored with their grandsons, and justifiably so, seeing as they are beyond adorable! Brag books were the perfect gift for each of them for Mother's Day.

Make Your Own Brag Book
Supplies:
- 3 paper lunch sacks
- double-stick tape- cardstock
- 8-12 photos
- brads
- 1 1/2 inch circle punch
- scrapbook paper
- quotes/stickers/stamps
The following is a step-by-step to making your own brag book photo album. The amount of photos may seem excessive, but I'm a very visual person and a little snap happy. Plus, can a tutorial ever be too clear?

Start with 3 brown paper lunch sacks. Lay them out just like above.
Stack them on top of each other in the same order.

Fold paper sacks in half to create a book.

Choose a patterned cardstock and cut to fit the back of the book PLUS an additional inch or so to wrap around the other side (where the brads will go).

Wrap the cardstock around the front and trim to the desired width.


Align the cardstock cover and the paper book. Poke brads through.

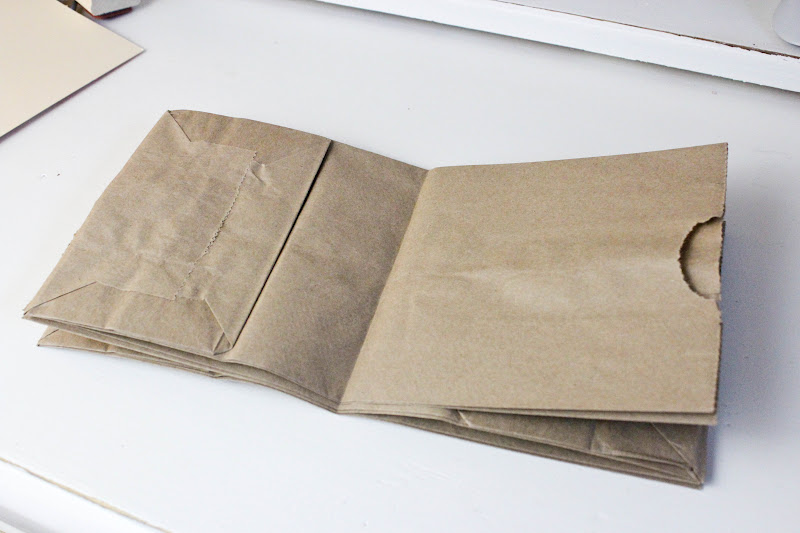
Now your brag book is assembled!

Here's the back.


Now you have three pockets to pull out extra photos.

Cut out cardstock to fit the pockets. I think mine were 4 inches wide and 5 inches long.

In each pocket, place double-stick tape where the arrows are pointing.

Adding the double-stick tape will make it easier to slide the cards in and out.
 Use the same 1 1/2" circle punch to make tabs.


Once your brag book is complete, it's time to fill it with photos, stickers, quotes, etc.
Here are some of the pages from the brag book o' Riot:


And here are some of the pages from the brag book o' Finn:

I may be the only one, but I find this funny.


They're such an amazing couple!


I'm sharing this brag book tutorial over at Cookie Nut Creations, Craft-o-maniac, Be Different Act Normal, I Heart Naptime, The DIY Dreamer, Uncommonly Yours, Mommy By Day Crafter By Night, My Girlish Whims, 52 Mantels, The 36th Avenue, A Glimpse Inside, Unveil Your Genius, Live Laugh Rowe, Trendy Treehouse, 30 Handmade Days, One Artsy Mama, Whipperberry, 5 Days 5 Ways, Crumbs and Chaos, Destination:Craft, An Original Belle.
super cute - I make these alot...and just posted a paper bag album myself. I found you via the blog hop and wanted to send some love your way on this awesome project and just became your newest follower would love for you to follow back if you have a chance...
ReplyDeletetina
one crafty mess
this is so sweet. Love it. pinning and now your newest follower
ReplyDeleteNatasha xx
Thanks for following Natasha!
DeleteThis is so neat! Pinning this!
ReplyDeleteI haven`t recently seen something so inspiring! Iwas planning to make something similar for my boyfriend. Thanks for the inspiration. Your newest follower,
ReplyDeleteAleksandra
I hope you do make one. Thanks so much for following Aleksandra! :)
Deletethank you for taking the time to have detailed instructions and pics. That really helps!
ReplyDeleteLOVE THIS!!!!!!!!! Honestly you did such a GREAT job!!!
ReplyDeleteThanks soooo much for sharing this at The DIY Dreamer.. From Dream To Reality! Don't forget to stop by this evening and link up your newest creations! :)
So clever and so cute! What a great idea! Pinning it!
ReplyDeleteI do love paper bag books. They are so much fun to make but I love you take on it.
ReplyDeleteI'm so pinning this! So dang cute! I'm featuring this tonight at the link party! Thanks for linking up!!
ReplyDeleteKathryn
destinationcraft.blogspot.com
What size pictures do you use?
ReplyDeleteI just used 4"x6" photos and cropped them down to fit. :)
DeleteIt is adorable!! Also, I was specifically looking for this type of book. I had seen one my niecey made and wanted instruction. I am also a visual person, and your step-by-step instructions were greatly appreciated!! Good job--well done!
ReplyDeleteLee